Building your dream home should be exciting—not overwhelming. By partnering with a reputable builder that meets your needs, you can focus on organizing your planning process while carefully evaluating design, timeline, and quality aspects. A successful build starts with solid financial planning; to start off right, begin by securing your financing and setting a realistic budget that includes a contingency fund. This initial preparation minimizes delays, prevents unexpected expenses, and ensures you have the capital necessary to handle unforeseen costs and compliance with regulations such as building permits and soil testing.
A well-organized pre-construction checklist helps you stay on track, adhere to local building regulations, and control costs while reducing potential stress. This guide outlines the essential steps to prepare for construction: financial readiness, land selection, builder vetting, and contract finalization.
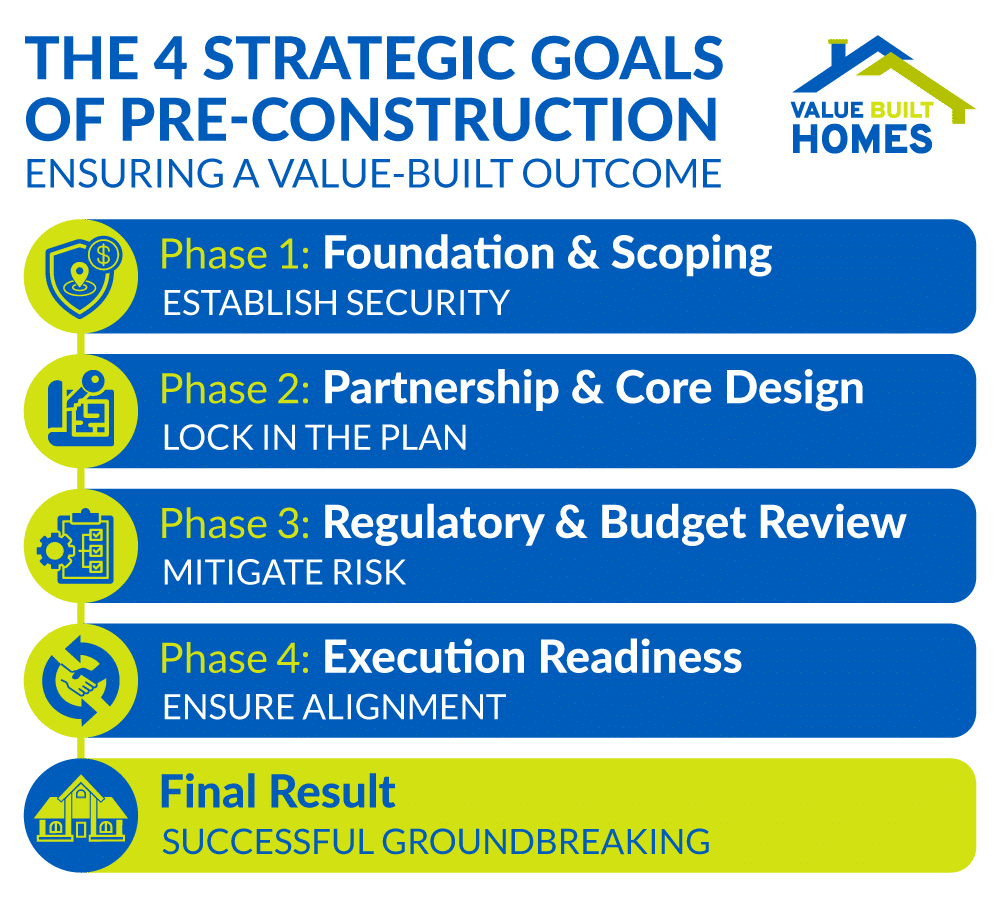
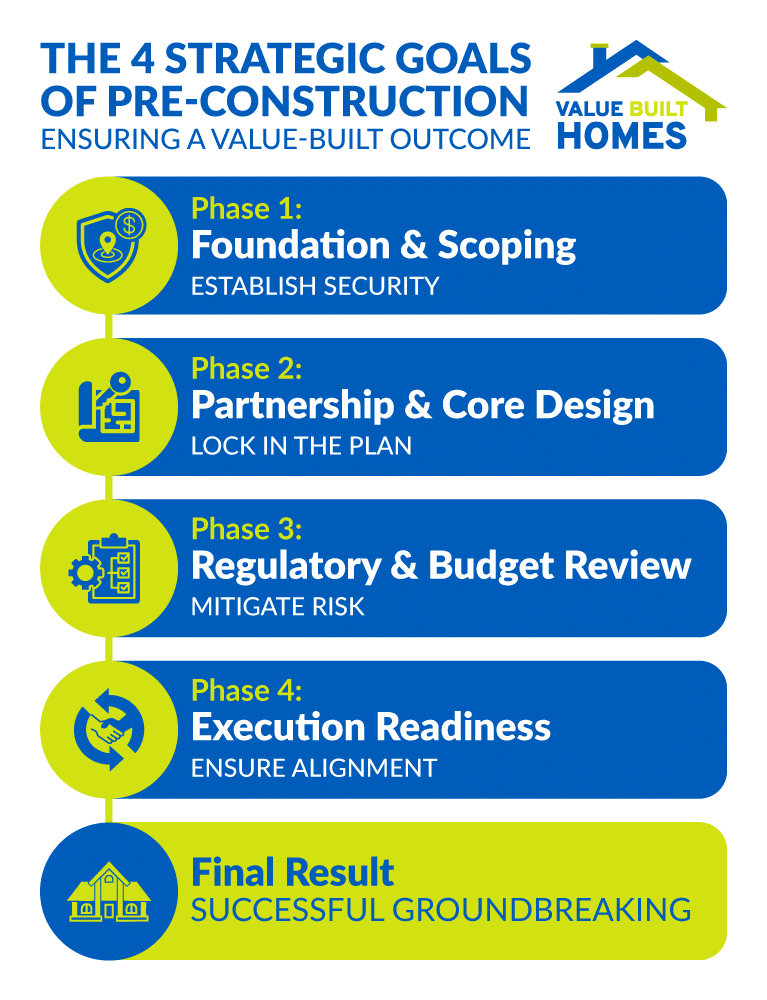
Phase 1: Foundation & Scoping
Before you can select a single fixture, you must establish the financial and legal bedrock of your project. This phase ensures you secure the necessary funding, define your non-negotiable needs, and confirm that your chosen land is suitable and legally buildable.
Financial Readiness & Pre-Approval
Begin by evaluating your financial situation and setting a realistic budget. This budget should account for monthly payments (PITI), cash reserves, and any extra costs that may arise. First, understand the difference between:
- Pre-qualification – an initial estimate based on self-reported figures.
- Pre-approval – a thorough review by lenders that confirms your borrowing limit.
Explore different loan options to find the one that best fits your needs:
- Construction-to-permanent loans that convert to a long-term mortgage.
- Two-time close loans, which separate the construction financing from the permanent mortgage.
- Government-backed loans such as FHA Loans for qualified buyers.
With your finances in order, secure a pre-approval letter and refine your budget before moving forward. This preparation sets the stage for defining your project’s scope.
Defining Project Scope & Priorities
Clearly define which home features are essential and which are optional. Start with a written project brief that outlines your must-have elements—big-ticket items like bedrooms, kitchen layout, and living spaces—while listing desirable upgrades separately. Consider factors such as family growth, remote work requirements, and future accessibility.
This initial delineation helps prevent costly changes later and ensures everyone involved understands your priorities. Once finalized, use your project brief as a reference for upcoming decisions regarding land, design, and budgeting.
Land & Lot Due Diligence
Selecting the right lot involves several local considerations. First, verify zoning restrictions and setback requirements in the county or municipality where you plan to build. Then, schedule the appropriate tests:
- Soil testing to confirm that the land can support your home.
- Evaluate whether utilities like water, electricity, and internet are available in your chosen area.
- Review HOA or architectural review rules if your land is located in a community.
When building in Indiana, be aware that zoning and setback requirements can vary significantly from one county or city to another. Check with your county’s Area Planning Office or Building Department for information about local flood zones, wetlands, and any Department of Natural Resources (DNR) regulations that may affect your lot. Use the Indiana DNR’s Floodplain Information Portal to confirm whether your property is in a regulated floodplain or near protected wetlands.
For help finding suitable locations, check local listings or builder websites. By collecting all necessary reports—such as a land survey, soil tests, and utility confirmations—you can minimize surprises. Once these details are in order, you’re ready to choose the right builder.
Phase 2: Partnership & Core Design
With your budget and land vetted, Phase 2 focuses on locking down the who and the what. Here, you choose the right builder, finalize your structural blueprint, and detail every specification—critical steps for ensuring the final home matches your vision and budget.
Choosing and Vetting the Right Builder
Selecting the right builder is critical to transforming your vision into reality. Decide among:
- Production builders, who offer cost-effective standard plans.
- Semi-custom builders, providing moderate personalization.
- Custom builders, who deliver full customization at a higher price point.
Some builders, including companies like Value Built Homes, emphasize affordability and tailored design options. While these builders market competitive pricing and standardized solutions, potential clients should be aware that customer experiences can vary. Check builder reputations, review past projects, and assess communication styles carefully. Request detailed proposals defining timelines, inclusions, and exclusions. Once you compare and assess credentials, finalize your builder choice with a signed proposal that meets your expectations in quality and service.
Floor Plan & Structural Decisions
Your floor plan dictates how your home functions. Choose a layout that supports efficient traffic flow, privacy, and future expansion. Then, review any structural options—foundation type, roof design, extra porches, or bonus rooms.
If you’re looking to simplify your decision-making, explore a range of floor plans available from various builders offering standardized options. Keep the following in mind:
- Ensure your final design suits your lifestyle.
- Document modifications or value-engineering options to balance cost and quality.
- Finalize the floor plan before selecting materials and finishes.
Specifications, Allowances & Selections
Detail the finer points of your build by defining materials, finishes, and builder allowances. Clarify how much is budgeted for features like flooring, cabinetry, lighting, and mechanical systems. This stage demands careful planning:
- Create a detailed specifications sheet for fixtures and finishes.
- Develop a clear allowance table so that each item’s budget is defined.
A comprehensive specifications document keeps everyone on the same page and helps you stay within your spending comfort zone. Once finalized, you can confidently proceed to establish a firm overall budget.
Phase 3: Regulatory & Budget Review
This is the final checkpoint before execution. Phase 3 focuses on fiscal protection and compliance, requiring you to assemble all estimates into a firm budget, structure your financing payments, and secure all necessary municipal and local permits.
Comprehensive Costing and Budget Guardrails
Assemble all estimates into a comprehensive budget that includes:
- Base home price and site preparation.
- Material allowances.
- A contingency fund for unforeseen items.
Review any escalation clauses and understand how price increases will be managed. Identify areas where you can adjust upgrades if your costs rise above what you envisioned. With these components in place, finalize a pricing summary and develop a solid contingency plan. This step protects your financial boundaries as you move closer to financing and permit approval.
Financing Structure & Draw Schedule
Clarify your financing structure to maintain project momentum. Lock in the details of your chosen loan, including interest rates and terms, and work with your lender and builder to form a draw schedule. For instance, a typical draw schedule might release 15% after the foundation is poured, 25% after framing, 20% after rough-ins, and the remaining balance upon completion. This ensures funds are available as needed while protecting all parties.
Permits, Local Approvals, and Pre-Build Requirements
Securing the right permits and approvals is crucial, and these are typically handled at the county or municipal level. Begin by identifying which permits are required—from general building permits to specialized approvals for systems like electrical or septic.
Typical Permits & Approval Timelines:
- General building permit (most common, 2–6 weeks for approval)
- Electrical, plumbing, and mechanical permits (1–3 weeks each)
- Septic or sewer connection permit (if needed, 2–6 weeks)
- Zoning and site plan approval (varies, often 2–8 weeks)
If your community has an HOA or architectural review committee, submit the required documents in advance. Schedule any necessary site inspections to confirm your lot meets local standards. Exposure to additional state codes may also be beneficial; for example, reviewing Indiana Residential Code Highlights can provide further guidance on compliance.
Phase 4: Execution Readiness
The preparation is nearly complete. In this final, critical phase, you mitigate all risk through comprehensive insurance and contract review, ensuring every party is aligned and ready to break ground immediately after the final signature.
Insurance, Title & Risk Management
Mitigate risks by securing proper insurance and title documentation. Verify that your builder maintains general liability coverage and set up your homeowner’s insurance policy well ahead of time. Work with a title company to confirm that the land is free of liens and that ownership records are updated.
Establish a process for collecting lien waivers with each payment draw. Proper insurance, clear title records, and documented lien waivers protect you throughout the construction phase. Before your first payment, ask your builder for a copy of their liability insurance certificate. At closing, ensure your title company provides evidence the land is free of liens—and remember to request a signed lien waiver every time you release funds for completed work.
Contract Review & Negotiation
Your construction contract serves as your project blueprint. Decide whether you’re using a fixed-price or cost-plus contract, and ensure that all major points are explicitly outlined. Key areas to review include escalation clauses, change orders, dispute resolution, and warranties. Negotiate any ambiguous terms or potentially unfavorable conditions before signing. A carefully reviewed contract sets the tone for a well-managed project and helps avoid unwanted surprises.
Selections Freeze & Pre-Construction Conference
Before construction begins, finalize your design selections. Freeze all decisions on fixtures, finishes, and materials to avoid last-minute changes. Next, schedule a pre-construction conference with your builder to cover responsibilities, establish communication expectations, and set timelines.
This meeting ensures everyone is aligned on the project vision going forward. Document all final decisions and verify that your specifications sheet is up-to-date. With these steps complete, you’ll be ready to finalize your paperwork and move confidently into construction.
Signing Day Checklist
Signing the contract is the final step before work begins. Review all documents carefully to ensure accuracy, especially concerning payment schedules and loan draw conditions. Clarify any last questions about site preparation or permit timelines.
By verifying every detail on signing day, you help your builder commence work promptly and accurately. Once the documents are signed, your path to construction becomes clear and organized.
What Happens After You Sign
After signing the contract, your builder will begin processing final permits and ordering long-lead materials. Site preparation follows—grading, leveling, or clearing as needed—after which foundation work commences.
Maintain open communication with your builder and track progress against established milestones. Verify that each phase aligns with the agreed draw schedule and address any issues promptly. Thorough preparation combined with regular communication is key to keeping your project on schedule.
FAQs
What is the difference between pre-qualification and pre-approval for new construction?
Pre-qualification is a rough estimate based on self-reported financial data, while pre-approval involves a detailed lender review that confirms your borrowing limit.
How do builder allowances work?
Allowances set a budget for specific items such as fixtures or finishes; if you exceed these preset amounts, you’ll be responsible for the difference.
What is a draw schedule in construction loans?
A draw schedule outlines when funds will be released at key construction stages, such as after completing the foundation or when framing is finished.
What permits might be required?
Typically, a general building permit is required. Specialty permits for electrical, plumbing, or septic systems may also be necessary based on your location.
When should material selections be finalized?
Finalize material selections before the pre-construction conference to ensure accurate orders and minimize potential delays.
Tips for Staying Organized During Pre-Construction
Staying organized significantly simplifies the pre-construction process:
- Keep documents in a clearly labeled digital folder or binder.
- Maintain a master timeline with key dates for permits, selections, and payment draws.
- Schedule regular check-ins with your builder.
- Track expenses carefully to ensure adherence to your budget.
For additional insights on budgeting, comparing builders, and design ideas, visit homebuilding blogs and websites to learn from the experiences of others who have navigated the process.
Successfully Laying the Foundation for Your Dream Home
A comprehensive pre-construction checklist not only sets clear expectations but also lays the groundwork for a streamlined and enjoyable building experience. By carefully managing finances, clearly defining your project scope, vetting your chosen lot, finalizing design and material details, and securing necessary permits and contracts, you position yourself for success.
Ready to take the next step? Schedule a consultation with Value Built Homes today for more guidance on achieving a cost-effective, stress-managed build. Your dream home is closer than you think.